Monday, 11 May 2015

How To Acquire A New Location & Avoid Screwing Up The Local SEO

Expanding your business by acquiring a new location? Columnist Andrew Shotland discusses how to preserve its existing search equity while rebranding.


new-location-ss-1920
Acquisition of competitor locations is a common growth strategy for multi-location businesses, providing quick entry into a market, economies of scale, etc. Typically, you’ll know exactly how much you can pay for a location — unless, of course, you don’t have good understanding of how easy it is to screw up its local rankings. It’s not uncommon for an acquisition that looks good on paper to look absolutely horrible on Google, often making the price a lot higher than expected.
If you’re going to buy some new locations, you would do well to hand this to-do list over to your deal guys and whomever is managing the digital part of the transition:

1. Get The Old Domain In The Deal & Keep It Live

Goes without saying right? Wrong. I can’t tell you how many times we have been brought in post-acquisition, and the old domain (which is typically the old brand) is 404ing. The seller stopped paying the hosting bill, and the acquirer didn’t even think about it because they were going to use their brand’s domain.
There’s no quicker way to lose organic, referral, social and direct traffic than turning off the old site. At a minimum, you should 301 redirect the old site to your new site, or to the page for the new location on your site.

2. Get Old Corporate Links In The Deal

If the old brand was part of a multi-location company and had a single landing page on the corporate site, then see if your Biz Dev guys can get the seller to agree to 301 redirect the landing page on their site to the new location page on your site.
If you can’t get that, then at least see if you can get them to agree to link from their site to the new location page on your site for at least a few months after the deal closes to keep the link juice flowing during the transition.

3. Get The Old Phone Numbers In The Deal

Consistent NAP (Name, Address, Phone) data is a critical part of local SEO. When you rebrand a local business, you often go through a ranking rollercoaster as Google encounters inconsistent NAPs throughout the Web.
Keeping the phone numbers consistent can help. Also, if the business had print ads displaying phone numbers, those numbers may continue to generate leads for some time that you’ll want to capture.

4. Get Access To The Old Google My Business & Citation Pages In The Deal

It still blows my mind that, in 2015, you can spend a huge amount of money buying a business and not get the login for its Google My Business (GMB) page or its local citation profiles (e.g. Yelp, YP.com, etc.).
When you buy a car, you typically ask for the keys, right? Ask for the GMB and citation keys, too! In writing.

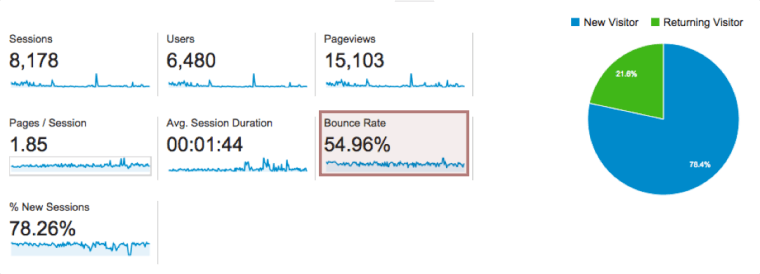
5. Get Access To The Old Google Analytics Data In The Deal

Funny story. A new client calls me up. Can’t get into her Google Analytics (GA) to give us the access we had requested. Turns out a former (disgruntled) employee has the login and wants $60,000 to give her access!
We worked it out with Google, and the blackmailer got bupkis. But come on, people — ask for access to the Google Analytics data… in writing! It’s easy enough to set up a new GA profile, but the historical data might be of interest to you.

6. Do NOT Mark The Old Business’ GMB Page As “Closed” *

For some reason, new owners love to mark the old brand’s Google My Business page as CLOSED. I am thinking there’s a certain perverse satisfaction in erasing the old brand from existence.
Too bad all this does is show that the place you just spent your hard-earned simoleons on is CLOSED. Remember, just because your brand is super-duper catchy doesn’t mean that people won’t still be searching for the old brand — and they’ll probably be searching for a long time.
A better strategy would be to update the old brand’s description to say that it is now known as your brand.

7. Do NOT Mark The Old Business’ Citation Pages As “Closed”

See the previous note, except now do this on every key local search site you can find like Yelp, YP.com, Abumba, etc. Fun work. Might want to use some local listings management tools for this step!

8. Update The NAP At The Main Business Aggregators First

When you update a business’ NAP information at the companies that supply the base set of business listings to many of the major local search services — Acxiom, D&B, Factual, InfoGroup, and Neustar Localeze — it can often take a long time for that data to make it out onto the Web in places Google can find. We tell clients that they should expect to see the results of data aggregator updates in about 90 days; in reality, however, many of the publishers that use this data update it sporadically, so there’s no telling when it will show up.
If you want to be really on top of your game, you may even consider updating the NAP at the aggregators before you rebrand. This could cause a bit of turbulence early on, but should make for a smoother transition once the new brand is launched.

9. Update The Old Business Citation Pages Next

Forgetting about the old brand’s citation profiles on the major local directories is one of the most common mistakes I see in rebranding. If you got the log-ins to these profiles in the deal (you got ‘em, right?), then go in and update the business name and any other pertinent info.
Make sure you note somewhere in the description that this location was formerly known as the old brand. People are still going to search for the old brand, and you want to make sure these profiles still show up on the local search sites and in Google for these queries. I have seen businesses lose a ton of lead volume instantly by no longer showing up for these old brand queries in local search sites.

10. Update The Old Google My Business Page *

Now that you have seeded the Local Search ecosystem with your new NAP, it’s time to update the old brand’s GMB page. Remember, do not mark it as “Closed.” Just update the business name and other changed NAP info, and be sure to mention the old brand name in the description.
Of course, this kind of thing never goes quite as planned, so be sure to set expectations that this will be a bit of a SEO rollercoaster ride. Good luck!

* As noted in the comments, these items are technically against Google’s guidelines and rebranding the old GMB page may get over-ridden by Google, often via Google Mapmaker editors. If the GMB page gets closed by MapMaker editors then you should try to get it re-opened and continue on with what you are doing (that’s why getting the phone number & domains is important because it supports the claim that you own the listing when they call the location). And if you just keep hitting a brick wall with this, then just create a new listing and get them merged (again, having the old phone # is key) by getting on the phone with Google Local support.

Source: http://selnd.com/1JC1YvF

15 Places You Should Be Sharing Your Blog Posts (Other Than Facebook And Twitter)

Simply writing and publishing blog posts isn’t enough. There’s so much digital noise out there today that this isn’t an “if you build it, they will come” kind of thing. Your work has only begun once you hit the “Publish” button – now, it’s time to promote your work.
For most bloggers, the natural first step is to share their content on Facebook and Twitter – but after this, many writers are at a loss. If all you’re doing is showcasing your blog posts on these sites, you’re missing out on the thousands of potential views that could come from sharing on other platforms.
Here are 15 additional places you should be sharing your blog posts:

SlideShare

Turn your blog post into a slideshow presentation using PowerPoint or other software, and share the resulting document on SlideShare. Quality content presented in this format stands out, and there’s less competition on SlideShare than on other sites.
Here’s an example of a blog post that When I Work (my company) turned into a Slideshare presentation:
When I Work Example

Visual.ly

Not only is Visual.ly dedicated to helping companies create infographics and other types of visual content, it also provides a community for sharing these files. By turning your blog content into infographics or other visual content pieces and sharing them on this site, you’ll dramatically increase your blog’s exposure.

LinkedIn Groups

Sharing your content in LinkedIn Groups offers you targeted exposure beyond your usual list of connections. Just be sure the group welcomes shared content, and make sure the post is relevant to the group topic. Being perceived as a spammer on these sites won’t do any favors for your brand.

Pinterest

Pinterest’s active community makes this a great place to build traffic. By posting an attractive, relevant picture with a link to your post, your shareable image can help bring readers to you.

Instagram

Instagram is another visual sharing site similar to Pinterest – use the same strategy you’d use to get your content noticed there and on Twitter on this site. Instagram has a strong reach into the teen and young adult demographics, making it a very attractive content sharing option for brands.

Triberr

If you need traffic fast, look no further than Triberr. This platform is a social network where joining targeted “tribes” can help you build relationships with other bloggers and earn traffic by sharing others’ content.

StumbleUpon

StumbleUpon is a social network that allows users to browse random web pages by clicking the “Stumble” button. Add your content to the network, and if users like it (as noted by their ratings of your post), it’ll become more likely to appear in the random search rotation. It’s an easy way to drive credibility andincrease readership.

Google+ Communities

Google+ is another social networking tool that can be used to expand the reach of your blog. By posting into targeted Google+ communities, you’ll get your content pieces in front of interested readers in order to boost traffic. Again, though, be careful of coming off as too self-promotional. Post unique content to Google+ and be sure that any shares you post offer legitimate value to your followers.

BizSugar

If you blog about small business in some way, consider sharing your post to BizSugar. This site is designed to help bloggers share small business news and tips, making it a great place to find new readers if this is your target audience.

Your Email List

By using a lead magnet – a valuable free giveaway that’s provided in exchange for your followers’ email addresses – it’s easy to build a list of subscribers who are interested in your content and your industry. When you have new blog content, share it with your list via email. If you post frequently, consider sending weekly or biweekly updates to avoid overwhelming your subscribers with messages.

Scoop.it

Scoop.it is one of the places web users head to when they’re looking for new, interesting content, making it a great place to publish your blog posts. You can start using the program for free, but these “freemium” accounts are limited to one topic. For $11/month, you can upgrade to five topics, while business accounts with 15 topics are $67/month.

Niche-Based Social Bookmarking Sites

Depending on your particular focus, you can post to a variety of social bookmarking sites. Inbound.org, for example, is great for SEO, SMO, blogging, and internet marketing. ManageWP.org is a good place to post WordPress-related articles, while DesignFloat is perfect for web designers, and DZone is a good fit for developers.

Blog Engage

Blog Engage is a site that lets you publish blog posts on a wide variety of topics for others to read. Everything from finance to anime to cosmetics is covered, so no matter what your focus is, you can find an audience of potential new readers on this blog sharing website.

Industry-Specific Social Networks

Apart from niche-based social bookmarking sites, some industries have their own specific social networks where they share information, help each other, and offer advice. Active Rain from Trulia, for example, is a network created exclusively for Realtors. If your industry has a similar network, be sure you’re sharing your work there.

Reddit

Finally, if you have a specific niche, there’s likely a Reddit sub-forum for it. That said, Redditors (the site’s users) can be very intense, so make sure the content you share is very targeted, very high-quality and completely free of “marketing-speak”. The site has a HUGE amount of traffic, so if you can gain credibility, this can be a great source of readership for your blog.
Finding places to share your blog posts isn’t difficult – the internet is an enormous place with a tremendous number of opportunities. Just be sure that your content is relevant to the specific community you target and meets stringent quality guidelines before sharing. When you do so, you’ll discover that there are thousands of potential readers available out there for you that you’d never meet by sticking to Facebook and Twitter alone.
Are there any other online resources you use to share your content? Leave a comment below with your recommendations!

5 Easy Google Analytics Tips for Web Publishers

If you’re running a blog or magazine-style website and are having success with it, you have no doubt put in a lot of hard work building an editorial process, publishing articles, and have conducted the necessary hand shaking to build your readership.
Trust us, we know how much hard work it takes to become a successful web publisher. We all started at the same place at one point. However, once you’re a successful plateau of content generation, you may find yourself wanting more… wanting to build a better experience for your users that generates more page views, more engagement, more signups, and of course, more revenue. And, that’s where really understanding Google Analytics comes in to play.
Let’s focus on three specific reporting tips that fit well for web publishers:custom dimensions, segments, and goals. Before we jump into each, let’s take a look at a few things every Google Analytics report consists of: dimension and metrics.
Dimensions – On the left side of your report you will view the report dimensions. Dimensions describe your data. An example of this would be the Location report (found under “Audience”). The location information you see on your left (country in this screenshot) is the dimension of the report.
Untitled document - Google Docs
Metrics – On the right side of the reports, you’ll see the metrics – quantitative measurements of your data. In the screenshot above you can see the acquisition and behavior metrics that correlate with each location dimension.

Custom Dimensions

Now that we have the basics covered, let’s jump into some of the more advanced things we can do with Google Analytics account that will give us a better understanding of how users interact with our website and content.
Now, by default Google Analytics gives us a ton of different dimensions. But, because every website is different, with varied content and users, it’s important to get specific with the kinds of reporting to make right choices for our content. This is where custom dimensions come into play – they allow the web publishers full control to generate reports that feature just about any kind of information or data set that you can think of regarding user data. A few examples of custom dimensions for web publishers are:
  • Article category: Which of your article categories is the most popular?
  • Article tags:  Which tags are your users clicking on the most?
  • Author: Who is the top author of your content?
  • Publication year: Is the current year the most popular of a previous year?
  • User login status: How do data points change for logged-in users (if enabled)?
  • Article length: What is the average length of are your most popular articles?
  • Featured image: Do users spend more time on articles with a featured image?
  • Video: How does your audience respond to posts with videos included?
Once you decide which custom dimensions best describe your content and audience, you can use those specific dimensions to learn more about readers wants/needs. Using some of the examples above, you can find out information about say, your readers’ favorite article category. Now, you may be spending all of your time crafting all of your content about “category A”, but then find out after setting up a custom dimension that “category B” is getting all the attention. Armed with this information you can now adapt to your user’s interests and create content for the preferred topic.
Another example could be content that features video. Maybe you’re not happy with the user engagement data you’re seeing in your analytics overview – time on site is short and bounce rate is high. For some reason you can’t seem to keep your users around long enough. Then you create a custom dimension that looks at your video content, and notice that compared to your overall data, time on site is way up and that bounce rate goes down. You can now make a decision on how to include more video content and create a richer experience for your users.
In order to get started with custom dimensions, you must first make sure your account has been upgraded to Universal Analytics – chances are if you’ve set this up in the last few years it already is, but an older Google Analytics installation might have to go through the upgrade process. You won’t be able to view any custom dimension data until you actually define them – Google Analytics will only track that data from the initial date of setup. You can only define a total of 20 custom dimensions in the free version of Google Analytics so choose them wisely.
Creating a custom dimension is a fairly painless two-step process.  The first step is accessing the custom dimensions tab in the admin section of your Google Analytics account; go to admin and then access the “custom definitions” drop down in the center column (labeled “properties”):
Untitled document - Google Docs (3)
Next, you will create your first custom dimension:
Untitled document - Google Docs (4)
Then, you will define the type of dimension you are looking to track:
Untitled document - Google Docs (5)
The last step will require you to update your Google Analytics code to track the specific data properly. If you’re not the primary developer for your website, you’ll need to reach out to your web developer to make sure the code is properly installed. If you’re a WordPress user using, for example the popular Google Analytics plugin by Yoast, if you upgrade to premium version of the plugin you’ll be able to track custom dimensions without touching a line of code.

Segments

Next, let’s jump into segments, a tool that helps us understand our content and users. Segments are nothing more than subsets of our data and they can be applied to any Google Analytics report easily.
Let’s look at a hands-on example to explain importance of segments.
no-segments
Looking at this report, we can tell that bounce rate is 54.96%. Does this mean estimating likelihood next user to visit our site will bounce at just under 55% is the best we can do? Absolutely not. And, that’s where segments come to the rescue.
Digging deeper into our sample website data, trying to figure out why bounce rate wasn’t lower got me to audience geo-report that simply lists our top countries, ranked by number of sessions.
audience-location
You see how bounce rate for one country REALLY stands out? For some reason Spanish people hate this website. Perfect time to create our first segment. Read about the “how to’s” of building segments here. For this example, all you need to know is that segment represents a subset of traffic that’s coming from Spain.
Once you have created a segment or picked one of the built-in segments, you can apply it to your reports and see a subset of data from all reports associated with that particular segment.
spain-segment
Applying the “Spain” segment allowed me to discover something interesting. The screenshot above is from Exit Pages report (since I was looking into bounce rate) and it helps me see which pages Spanish audience is leaving my site from. Unusually high percentage of people from Spain, compared to site average, leaves my blog page. I know there’s nothing offensive to Spanish audience there, but I also happened to run across a report that says of all EU countries, Spain has lowest percentage of people able to hold a conversation in English.
That is a clue. It tells me I could probably try translating a few posts to Spanish to see if that reduces bounce rate for this particular segment, which will in turn decrease overall bounce rate. Then I can focus on another segment… and another… and another. So, instead of trying to break a bundle of sticks all at once, segments let you break them one by one. Aesop and segments for the win.

Goals

While custom dimensions and segments are extremely important in helping you gain some wonderful insight into how your user base interacts with yourcontent, unless you’re tracking goals conversions, how can you tell if your business is succeeding or failing?
Let’s take a look at the 4 types of goals you can create in your analytics account, but before we do, keep this in mind, a Google Analytics will only start tracking goal conversions after you have defined your goals. You can’t create a goal and see how many people would’ve converted on it in January 2012.

Destination Goals

Destination goal is triggered when a user visits a certain page, or multiple pages in specified order. A great destination goal example would be user visiting your “sign up for our newsletter” page, followed by that same user visiting “thank you for subscribing” page after they’ve clicked confirmation link in an email.
destination-goals

Duration Goals and Pages Per Session Goals

These two goal types are similar in sense that they both track engagement, they just do it in different ways. A duration goal will convert every time a user session lasts longer than time you specified, pages per session goal will convert whenever a session consists of “X” pages or more, “X” being number you specified when creating the goal.
They’re both easy to set up and very important for web publishers, so they are a great way for you to familiarize yourself with Google Analytics goals.

Event Goals

Finally, event-type goals are triggered when user complete an action or multiple actions you defined. These can be many different interaction with your site, but a great way to think about them is, for example, wanting to track specific clicks on an advertisement. How valuable would that information be to sponsor? Using this example you would use a line of Google Analytics code to tell analytics to trigger these clicks as an event, then set up an event goal to create the reports. Then you could track different ad placements to see how they perform against each other. Other examples of event goal tracking include goals that don’t have destination pages – download links or ajax buttons that complete a goal without sending the user to an additional web page.
event-goals

Bonus: Goals & Segments

Remember those built-in segments I mentioned earlier? Three of those are goal conversion segments and they help isolate users who convert and sessions in which conversions occurred:
  • Converters
  • Non converters
  • Sessions with conversion
By applying these to your reports you will be able to tell what it is that makes users convert. Perhaps a certain acquisition channel converts far better than others? Are there some landing pages that help conversions? Getting answers to these questions is easy if you apply one of these segments.

In Summary

If you’ve made it this far, you’re ready to jump into your analytics and start answering some of the questions you no doubt have bouncing around your head.
  • What categories of content are my users most interested in?
  • Which one of my guest authors is crushing it?
  • Do people prefer posts with videos in them?
  • Does anyone download that free PDF I spent months working on?
The list will be different for everyone, but they’re all great questions to ask.
Remember, use custom definitions to describe your content better than Google Analytics does it out of the box. Create user segments to better understand your users, and most importantly track goal conversions to know if your website fulfills its target objectives.
This process will help bring your website goals closer to your actual business goals, and you’ll develop more ability to change and adapt at a pace that will have a huge impact on revenue.


Source: http://www.searchenginejournal.com/simple-google-analytics-tips-for-web-publishers/129069/